
PowerShell & Entra Graph APIs: OAuth 2.0 Authentication and Access
Tokens, Flows, and Practical PowerShell API Automation

Why OAuth 2.0 Matters for PowerShell Users
When you run Connect-AzAccount, magic happens behind the scenes. That magic is OAuth 2.0 - the industry standard for API authentication. Understanding OAuth means you can:
Connect to any Azure or Microsoft 365 API directly (no modules required)
Build custom authentication flows for your scripts
Troubleshoot authentication issues like a pro
Understand why some APIs need different permissions
Today we’ll demystify tokens, flows, and the art of getting past Azure’s login screen - then show you how to use those tokens in real PowerShell API calls.
Authentication vs. Authorization: Know the Difference
Before diving into OAuth, let’s clear up two terms that get mixed up constantly:
Authentication (AuthN): Proving who you are (”Yes, I’m really Bob”)
Authorization (AuthZ): Proving what you can do (”Bob can read files, but not delete them”)
OAuth 2.0 handles authorization - it gives you tokens that prove what your app can access.
The Token Trio: Access, Refresh, and ID Tokens
OAuth 2.0 revolves around three types of tokens:
Access Tokens: Your temporary API key (usually expires in 1 hour)
Refresh Tokens: Long-lived tokens that get you new access tokens
ID Tokens: JWT tokens that contain user identity information (used in OpenID Connect)
Access Tokens
Access tokens are also called “API Keys”. These are basically usernames and passwords to request a token.
When you request an access token, you POST your client ID, client secret, and the scope of permissions you’re asking for. The server responds with a token that you can use to authenticate API requests.
#Create an Client Credentials Flow token request body
$body = @{
    client_id     = <Create an app registration and add guid here>
    scope         = https://graph.microsoft.com/.default
    client_secret = <Create a secret in the app registration to place here>
    grant_type    = client_credentials
}

$tokenRequest = @{
    Method = Post
    Uri = "https://login.microsoftonline.com/$tenantId/oauth2/v2.0/token"
    ContentType = "application/x-www-form-urlencoded"
    Body = $body
    UseBasicParsing = $true
    }

    $invokeToken = Invoke-WebRequest @tokenRequest
    $token = ($invokeToken.Content | ConvertFrom-Json).access_token
Refresh Tokens: Long-lived tokens that get you new access tokens
Refresh tokens are used to get new access tokens without having to re-authenticate the user. They are typically long-lived and can be used to maintain access to an API over time.
# Trade your refresh token for a new access token
$body = @{
    grant_type = 'refresh_token'
    refresh_token = $Token
    client_id = $ClientId
}
$refreshsplat = @{
    Method = Post
    Uri = "https://login.microsoftonline.com/$tenantId/oauth2/v2.0/token"    ContentType = "application/x-www-form-urlencoded"
    Body = $body
    UseBasicParsing = $true
}
$refreshtoken = Invoke-WebRequest @refreshsplat
$newAccessToken = ($refreshtoken.Content | ConvertFrom-Json).access_token
ID Tokens
These are advanced tokens that contain user identity information in an encrypted format. They are used in OpenID Connect flows to provide information about the authenticated user. We will cover these under the certificate authentication flow.
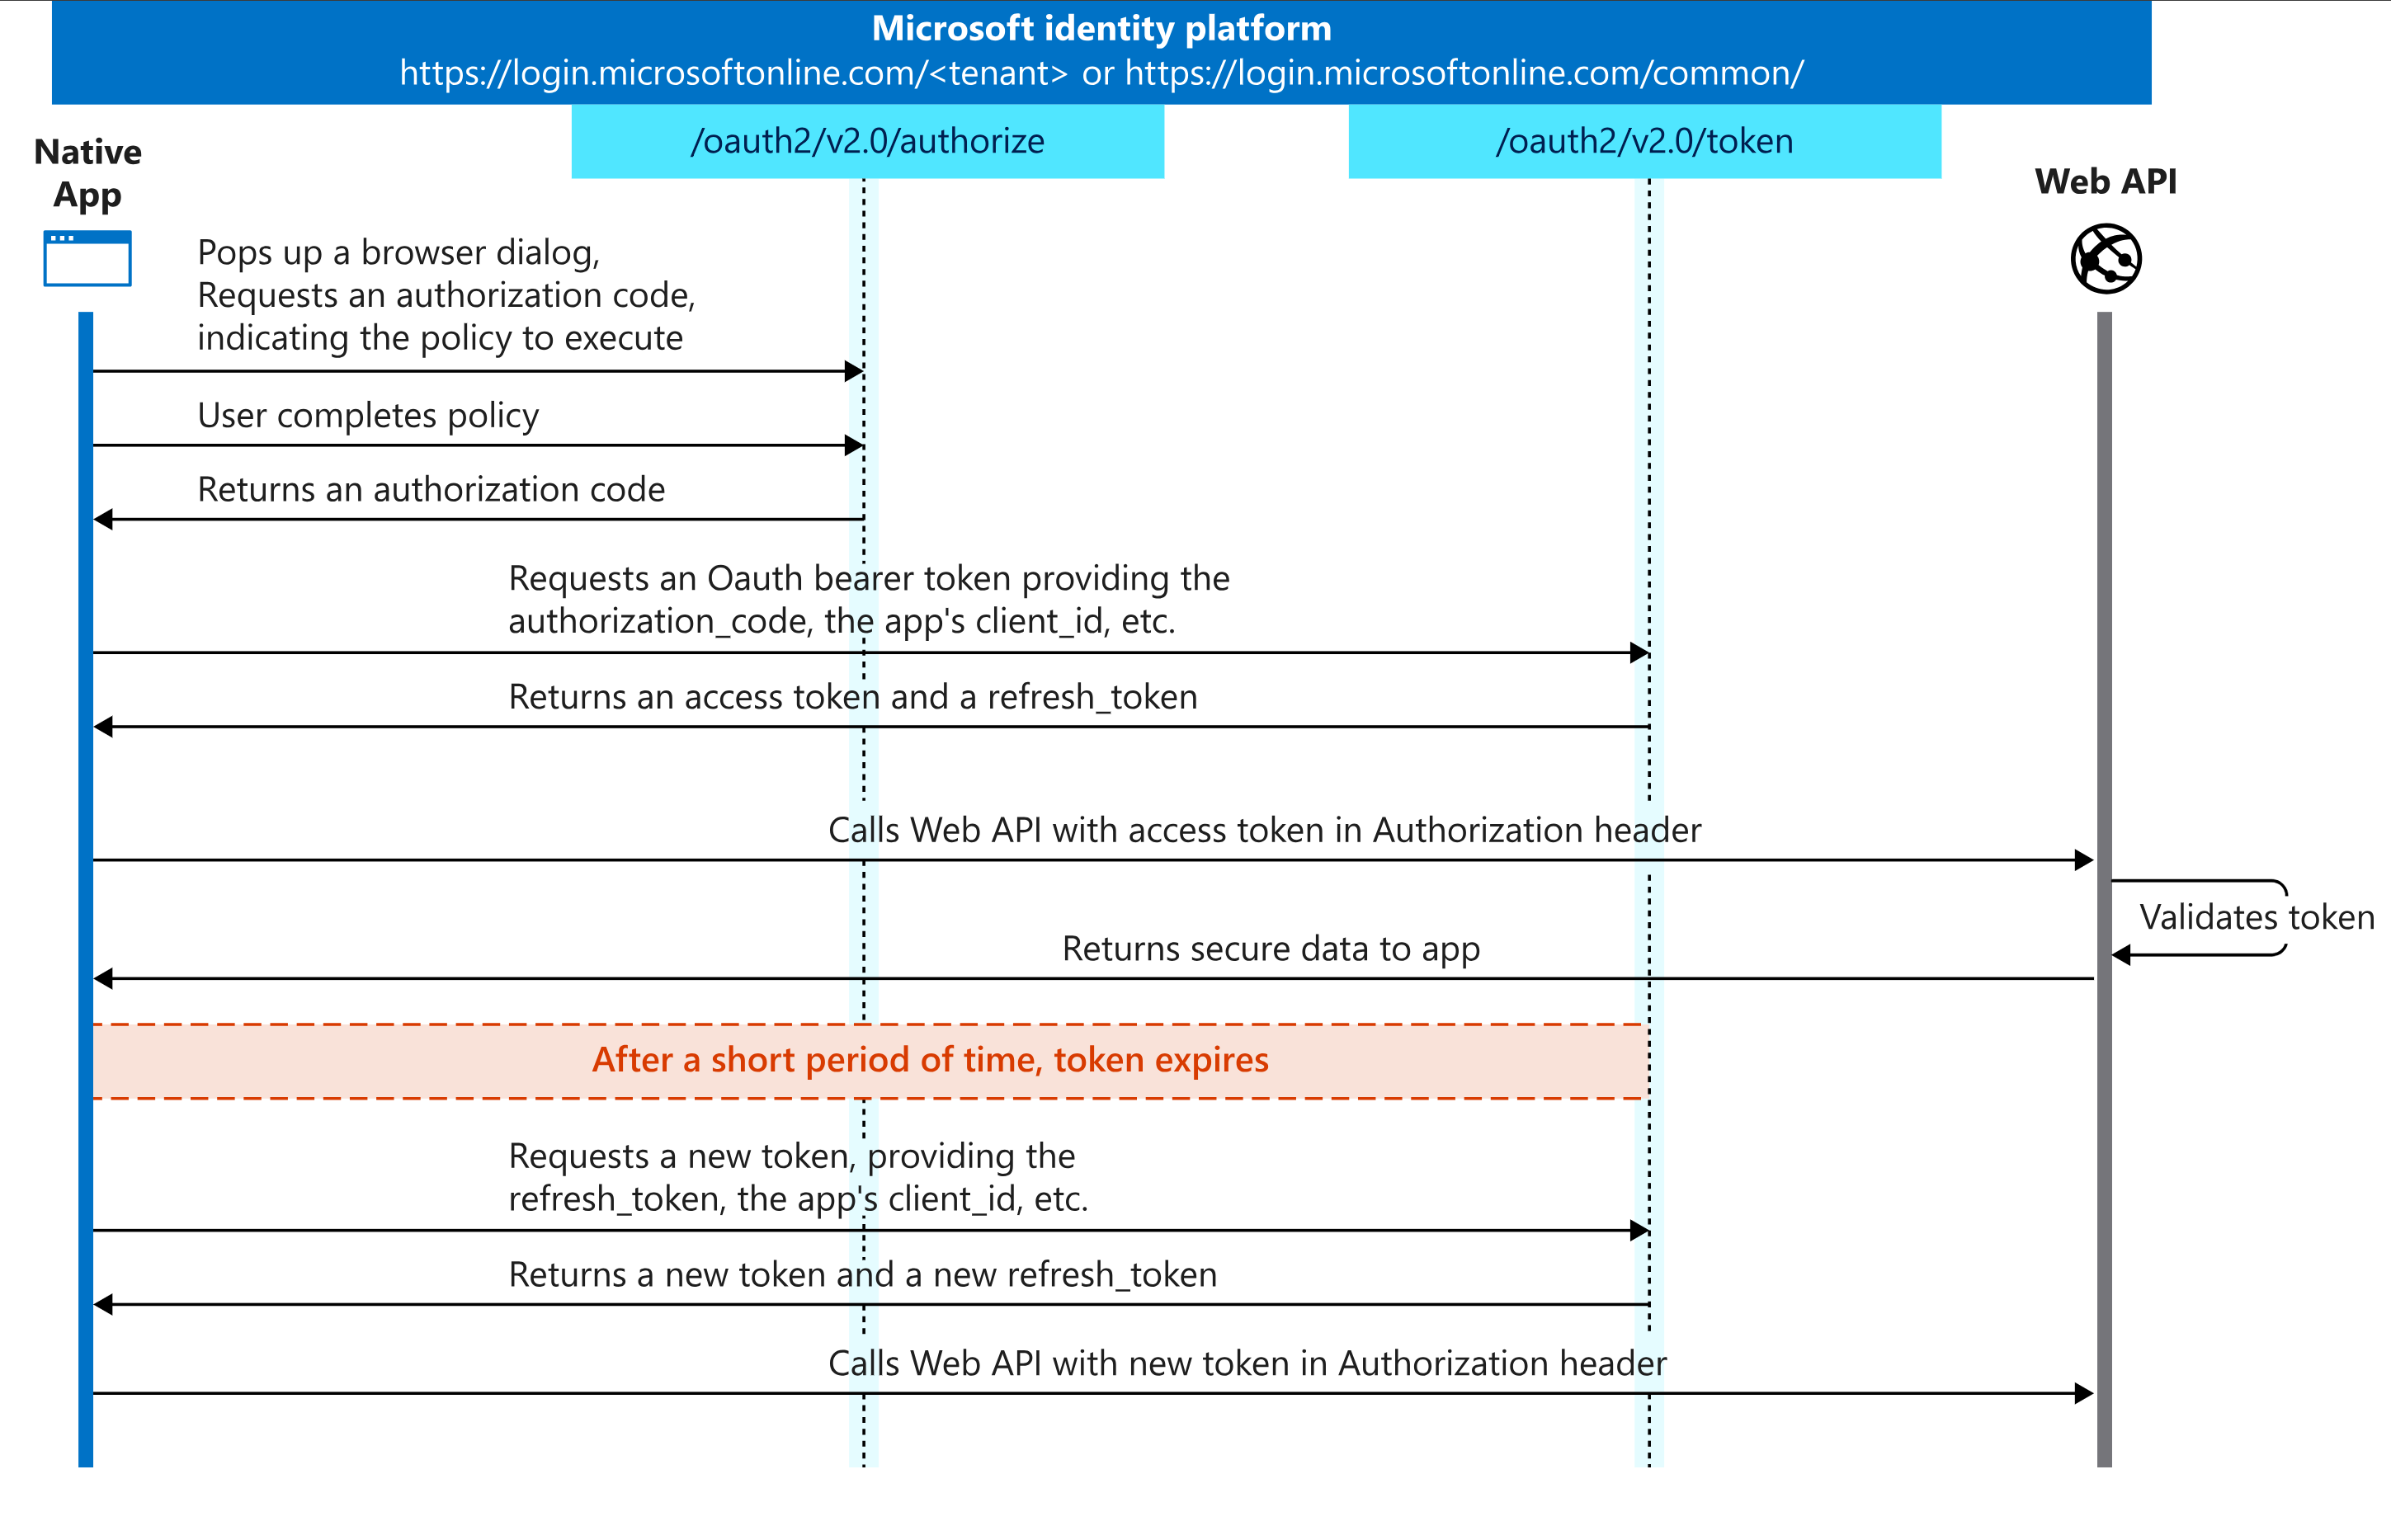
PowerShell OAuth Flows: Pick Your Adventure
There are several ways to get tokens, depending on your scenario:
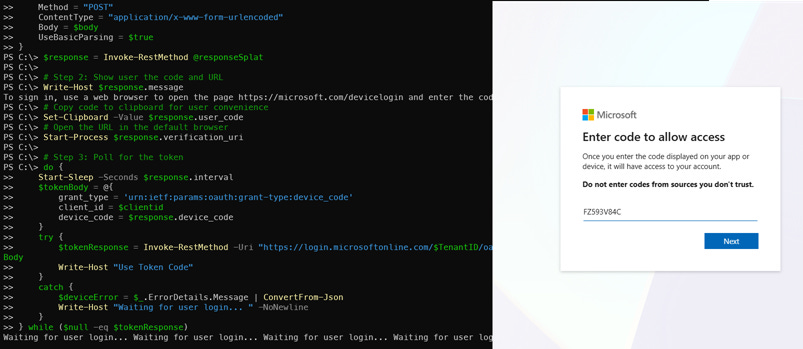
Device Code Flow: Perfect for Interactive PowerShell Scripts

Device codes are ideal for interactive scripts which require the user’s permission. The user will be prompted to visit a URL and enter a code to authenticate. This flow is great for scripts running on machines with no web browser or in environments where interactive login is not possible.
In the Azure application portal, device code authentication requires the “Allow public client flows” setting to be enabled. This allows the application to use the device code flow for authentication.
# Step 1: Request a device code
$body = @{
    client_id = $clientid  # Register your own Entra app!
    scope = ‘https://graph.microsoft.com/.default offline_access’
}
$responseSplat = @{
    Uri = "https://login.microsoftonline.com/$TenantID/oauth2/v2.0/devicecode"
    Method = "POST"
    ContentType = "application/x-www-form-urlencoded"
    Body = $body
    UseBasicParsing = $true
}
$response = Invoke-RestMethod @responseSplat

# Step 2: Show user the code and URL
Write-Host $response.message
# Copy code to clipboard for user convenience
Set-Clipboard -Value $response.user_code
# Open the URL in the default browser
Start-Process $response.verification_uri

# Step 3: Poll for the token
do {
    Start-Sleep -Seconds $response.interval
    $tokenBody = @{
        grant_type = ‘urn:ietf:params:oauth:grant-type:device_code’
        client_id = $clientid
        device_code = $response.device_code
    }
    try {
        $tokenResponse = Invoke-RestMethod -Uri "https://login.microsoftonline.com/$TenantID/oauth2/v2.0/token" -Method POST -Body $tokenBody
        Write-Host "Use Token Code"
    }
    catch {
        $deviceError = $_.ErrorDetails.Message | ConvertFrom-Json
        Write-Host "Waiting for user login... " -NoNewline
    }
} while ($null -eq $tokenResponse)

Write-Host "Success! Got your token."
# Note The Do/While loop will keep polling the token endpoint until the user completes the authentication process. The user will see a message prompting them to visit a URL and enter a code, and once they do, the script will receive the access token.
Client Credentials Flow: For Service Accounts

Client credentials is the most common form of api authentication. This flow is used for service-to-service communication where there is no user involved. It requires an app registration with a client secret or certificate. The app can request an access token directly from Entra without any user interaction. Best for: Automated scripts, Azure Functions, background services
# You need an app registration with a client secret
$body = @{
    grant_type = ‘client_credentials’
    client_id = ‘your-app-id’
    client_secret = ‘your-app-secret’
    scope = ‘https://graph.microsoft.com/.default’
}
$tokenResponse = Invoke-RestMethod -Uri "https://login.microsoftonline.com/$your-tenant-id$/oauth2/v2.0/token" -Method POST -Body $body

Write-Host "Got access token: $($tokenResponse.access_token)"
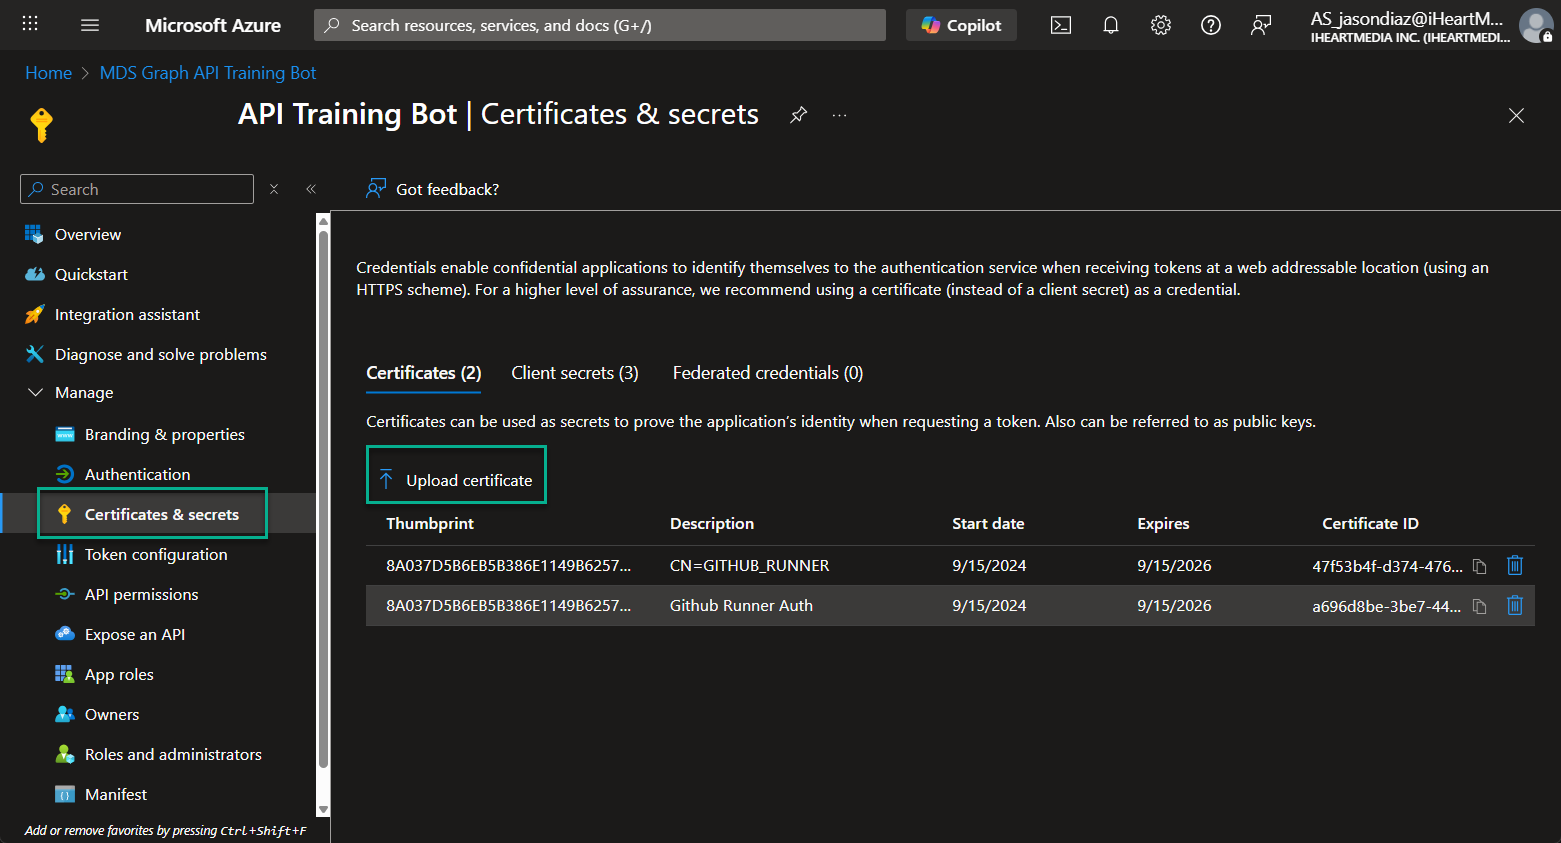
Certificate Authentication in Azure OAuth
Certificate authentication is a secure way to authenticate applications to Entra without using client secrets. Instead, you register a certificate with your Entra app registration and use it to sign requests for tokens. This is especially useful for automation, CI/CD, and service-to-service scenarios where storing secrets is risky.
How it works:
Create a self-signed certificate or use an existing one
Register a certificate in your Entra app registration (Certificates & Secrets tab)
Use the certificate’s thumbprint and private key to sign your token request
Entra validates the certificate and issues an access token
PowerShell Example:
The easiest way to use certificate authentication is the Microsoft SDK powershell modules. Connect-AzAccount and Connect-MGG In some enviroments you cannot install the module, so you can use the following code to get a token using a certificate:
$TenantName = "yourtenant.onmicrosoft.com"
$AppId = "your-app-id-here"
$CertThumbprint = "your-cert-thumbprint-here" # (Must add the certificate to the Entra app registration)
$Scope = "https://graph.microsoft.com/.default"
$Cert = Get-Item "Cert:\LocalMachine\My\$CertThumbprint" # this assumes the certificate is in the local machine store

# JWT times control the token’s validity period
$Now = [DateTimeOffset]::UtcNow.ToUnixTimeSeconds()
$Exp = $Now + 7200
$Nbf = $Now

# JWT headers are where the algorith and certitificate hash are specified
$JwtHeader = @{
     alg = "RS256"
     typ = "JWT"
     x5t = ([Convert]::ToBase64String($Cert.GetCertHash()) -replace ‘\+’, ‘-’ -replace ‘/’, ‘_’ -replace ‘=’)
}
# JWT payload contains the claims about the token
$JwtPayload = @{
     aud = "https://login.microsoftonline.com/$TenantName/oauth2/token"
     exp = $Exp
     iss = $AppId
     jti = [guid]::NewGuid()
     nbf = $Nbf
     sub = $AppId
}

# Here is a simple function to encode the JWT parts
function Encode-JwtPart($obj) {
     [Convert]::ToBase64String([Text.Encoding]::UTF8.GetBytes(($obj | ConvertTo-Json -Compress))) -replace ‘\+’, ‘-’ -replace ‘/’, ‘_’ -replace ‘=’
}

# Using the function to create the JWT
$JwtUnsigned = "$(Encode-JwtPart $JwtHeader).$(Encode-JwtPart $JwtPayload)"
$PrivKey = [System.Security.Cryptography.X509Certificates.RSACertificateExtensions]::GetRSAPrivateKey($Cert)
$Signature = [Convert]::ToBase64String($PrivKey.SignData([Text.Encoding]::UTF8.GetBytes($JwtUnsigned), [Security.Cryptography.HashAlgorithmName]::SHA256, [Security.Cryptography.RSASignaturePadding]::Pkcs1)) -replace ‘\+’, ‘-’ -replace ‘/’, ‘_’ -replace ‘=’
$Jwt = "$JwtUnsigned.$Signature"

# Request the token using a JWT Client Assertion
#(Client assertion is the JWT we just created)
$Body = @{
     client_id             = $AppId
     client_assertion      = $Jwt
     client_assertion_type = "urn:ietf:params:oauth:client-assertion-type:jwt-bearer"
     scope                 = $Scope
     grant_type            = "client_credentials"
}
$Url = "https://login.microsoftonline.com/$TenantName/oauth2/v2.0/token"
$Token = Invoke-RestMethod -Method Post -Uri $Url -ContentType ‘application/x-www-form-urlencoded’ -Body $Body

# Save the Auth header for future requests
$AuthHeader = @{ Authorization = "$($Token.token_type) $($Token.access_token)" }
$Uri = "https://graph.microsoft.com/v1.0/users"
Invoke-RestMethod -Uri $Uri -Headers $AuthHeader -Method Get -ContentType "application/json"
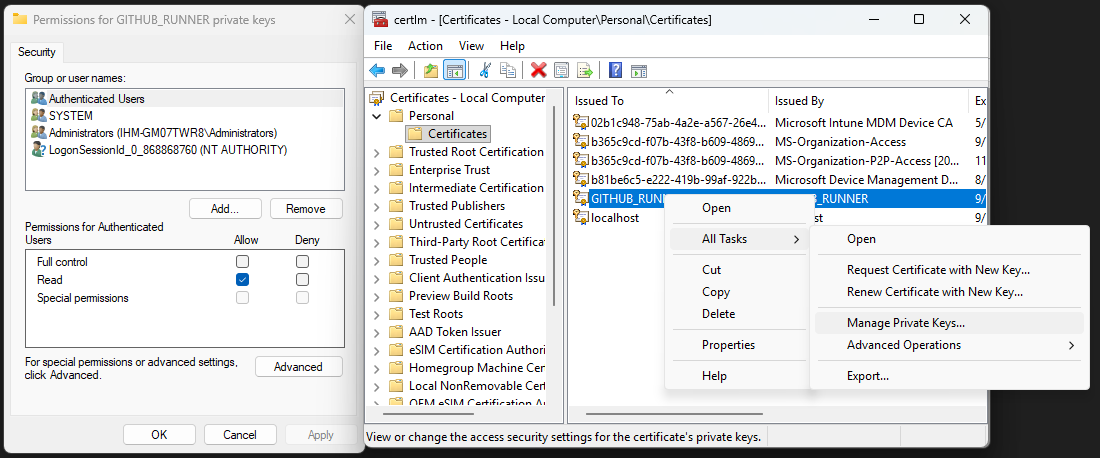
Note:
You can use certificate thumbprints from the Local Machine certificate store (Cert:\LocalMachine\My), which is common for automation and service accounts. However, you must update the permissions on the certificate to include ‘Authenticated Users’ so that your script or service can access the private key. This can be done via the certificate’s properties in the Certificates MMC snap-in (right-click > All Tasks > Manage Private Keys). Grant read access to the Authenticated Users group as shown in the image below.
Real-World Example: Using Invoke-WebRequest to Access Microsoft Graph API
Let’s put theory into practice. Once you have an access token, you can use PowerShell’s Invoke-WebRequest to call Microsoft Graph or other APIs.
Step 1: Register an Entra App
Note that for the next few steps you will need permissions in Entra to create an app registration. If you don’t have permissions, ask your administrator to create one for you.
Go to Azure Portal.
Navigate to Azure Active Directory > App registrations > New registration.
Name your app, set redirect URI (if needed), and click Register.
Note the Application (client) ID and Directory (tenant) ID.
Go to Certificates & secrets and create a new client secret. Save the value securely.
Step 2: Assign API Permissions
In your app registration, go to API permissions.
Click Add a permission > Microsoft Graph.
Select required permissions (e.g.,
User.Read,Mail.Read).Click Grant admin consent if needed.
Step 3: Acquire a Token with PowerShell
#First initialize the variables with your app registration details
$tenantId = $tenantId
$clientid = $clientId
$clientSecret = $clientSecret

# Build the token request body
$tokenUrl = "https://login.microsoftonline.com/$tenantId/oauth2/v2.0/token"
$body = @{
    client_id     = $clientid
    scope         = "https://graph.microsoft.com/.default"
    client_secret = $clientSecret
    grant_type    = "client_credentials"
}
# Request the token from Graph
$tokenResponse = Invoke-RestMethod -Method Post -Uri $tokenUrl -Body $body
$accessToken = $tokenResponse.access_token
Step 4: Use the token to call Microsoft Graph API
# Next we will use the access token to call the Graph API and get a list of users
$headers = @{ Authorization = "Bearer $accessToken" }
$uri     = "https://graph.microsoft.com/v1.0/users"
$response = Invoke-WebRequest -Uri $uri -Headers $headers -Method Get
$response.Content | ConvertFrom-Json
Key Parameters You’ll See Everywhere
When working with OAuth, you’ll encounter these parameters constantly:
ParameterWhat It Doesclient_idYour app’s unique identifier (not secret)client_secretYour app’s password (keep it secret!)scopeWhat permissions you’re requestinggrant_typeWhich OAuth flow you’re usingredirect_uriWhere Azure sends the responsetenantWhich Azure tenant to authenticate against
Mini Challenge
Register a new application in Entra (or use an existing class registration).
Use the Device Code flow to get an access token for Microsoft Graph.
Make an API call to
https://graph.microsoft.com/v1.0/meusing your token.Bonus: Try getting a refresh token and using it to get a new access token.
Common OAuth Gotchas and How to Fix Them
“Invalid Scope” Error: Make sure your app registration has the right API permissions and they’re granted consent.
“Invalid Client” Error: Check your client_id and make sure your app allows the flow you’re trying to use.
“Expired Token” Error: Access tokens expire! Use refresh tokens or get a new one.
“Redirect URI Mismatch”: The redirect_uri in your request must exactly match what’s registered in your app.
Final Thoughts
OAuth 2.0 is definitely a complex topic, but with practice more of the concepts will become clear. The api key + secret flow is the most common, but the device code flow is a great option for interactive scripts. Certificate authentication is the most secure but is also the most complex to set up. The Device Code flow is particularly powerful for PowerShell users because it works everywhere: servers without browsers or restrictive corporate networks.
Homework Assignment
Register an application in Entra (or use an existing class registration).
Implement the Device Code flow to get tokens for Microsoft Graph.
Make at least three different API calls using your access token.
Try using a refresh token to get a new access token.
Write a short reflection: How does understanding OAuth change your approach to API automation?
Further Reading and References
Reference for Device Code Block
The Device Code flow is documented here:
These resources explain how the device code flow works and provide sample requests and responses for Entra and other OAuth providers.
Important Update:
Microsoft has disabled the Azure PowerShell public client (client ID: 1950a258-227b-4e31-a9cf-717495945fc2) for new interactive authentication scenarios. For custom authentication flows, you should now register your own Entra app and use its client ID. Update all examples and instructions to use your own app registration for secure and supported authentication.
For more information, see: